
In this article, we will present how to add a hot reload mechanism (also called hot swapping) to Java applications. We will start by showing the requirements that must be met to ensure that our application can use this functionality. Providing the example of the OpenLMIS v3 application, we will explain step by step how to add this mechanism for a single Spring service in an application with a microservice architecture, deployed through Docker and Docker Compose.
What is the hot reload mechanism?
Hot reload, also known as hot deployment or hot swapping, is a development technique that allows developers to make changes to their codebase while the application is running, without the need to stop or restart the entire application. This means that developers can see the effects of their code changes almost instantly, speeding up the development process and increasing productivity.
In Java applications, achieving hot reload can be challenging due to the way Java classes are loaded and the restrictions imposed by the Java Virtual Machine (JVM). There are several approaches to implementing hot reload in Java applications. In this case, we will use a modified JVM (DCEVM) and Java agent (HotSwapAgent).

DCEVM and HotSwapAgent
Dynamic Code Evolution VM (DCEVM) is an open-source modification of the Java Virtual Machine (JVM) that provides support for dynamic class redefinition. Unlike the standard JVM, which typically does not allow changes to classes’ structure and hierarchy during runtime, DCEVM enables developers to make such modifications on-the-fly.
HotSwapAgent is used to facilitate the hot reload process. It injects bytecode changes directly into the running JVM, allowing developers to see their code modifications reflected in real-time.
For details including features provided by these tools see: DCEVM, HotSwapAgent.
How it works
- Triggering reload: When a developer makes changes to their code, the modified class files are compiled and replaced in the application’s classpath. The Java agent, such as HotSwapAgent, detects these changes and triggers the hot reload process.
- Class redefinition: The modified bytecode for the changed classes is then loaded into the JVM, replacing the existing bytecode in memory. This process is known as class redefinition.
- Applying changes: Once the class redefinition is complete, the JVM applies the changes, and the updated code takes immediate effect in the running application.
Setting up hot reload step-by-step guide
1. Add DCEVM and HotSwapAgent
The simplest way to achieve this is to use a ready-made docker image with a distribution containing JDK along with DCEVM and HotSwapAgent components.
However, if this solution is not suitable for your case (e.g. your application requires a specific version of Java, different from the one provided in this image), go to the Dockerhub page of that image, check the commands used for it, and adjust your Dockerfile accordingly.
In our case, this solution was sufficient. Since all OpenLMIS services use the openlmis-service-base base service, we will make the above-mentioned changes there:
FROM hotswapagent/hotswap-vmNote that we also removed the code responsible for installing the JDK because the hotswap-vm image already contains it.

Then we make sure that the specific service for which we want to use hot reload uses the appropriate version of base-service. For the purpose of this article, we chose openlmis-stockmanagement as an example.

In the case of OpenLMIS applications, you can skip the step of modifying openlmis-base-service yourself, and use an existing image.
FROM openlmis/service-base:6.1-dcevm2. Add the hotswap-agent.properties file
This file should be placed in the resources folder. Next, we need to set two properties in this file: autoHotswap and extraClasspath.
The autoHotswap property should be set to true to enable hotswap at runtime environment. For the extraClasspath property, we set the value as system variable placeholder, so that the extraClassPath value can be passed by commandline docker.
autoHotswap=true
extraClasspath=${extra.class.path}
3. Add volumes and environment variables
The last required configuration steps are:
- defining additional environment variables for the container – in this case, you need to set JVM options.
- determining the volume mapping between the host system and the docker container.
environment:

    JAVA_OPTS: "-XXaltjvm=dcevm -javaagent:/opt/hotswap-agent/hotswap-agent.jar=autoHotswap=true -Dextra.class.path=/extra_class_path"

  volumes:

- APP_PATH*/build/classes/java/main:/extra_class_path
Instead of APP_PATH*, provide the path to the service projects target directory. The files from this directory are the ones that will be reloaded. In the case of the OpenLMIS service, it may look like this:
/home/user/IdeaProjects//openlmis-stockmanagement/build/classes/java/main:/extra_class_pathIn our case, we added them in the reference distribution service to the docker-compose.yml file in the place where the stockmanagement service is defined.
Hot reload triggering
With the application configured this way, we can build all the necessary images and run the application.
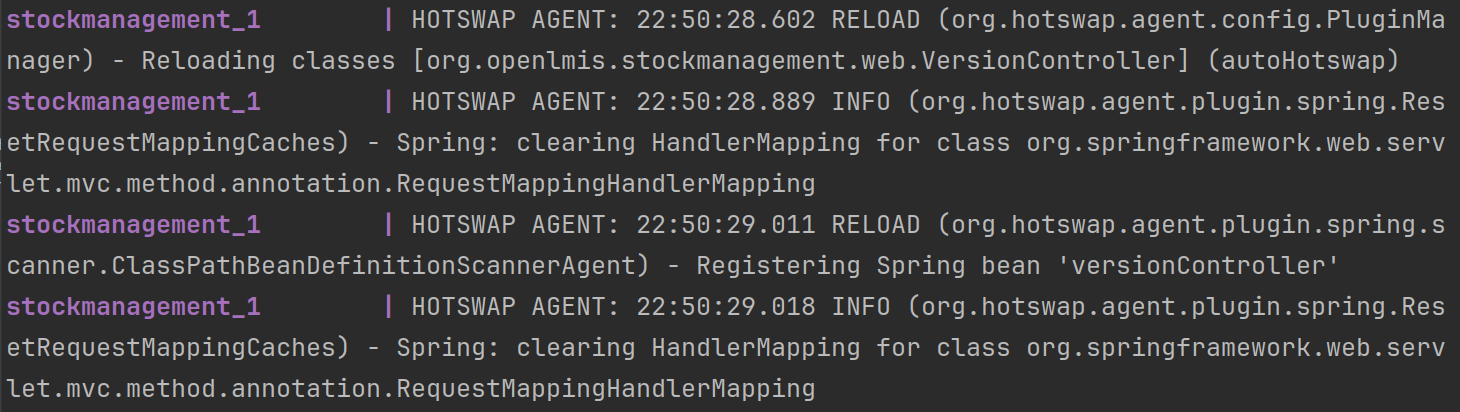
After making any changes supported by DCEVM and HotSwapAgent in the service code, start the compilation process (e.g. using the IDE). After it is completed, hot swapping should be triggered and the changes made should be visible. To confirm, we can look at the application logs:
Possible issues
It can happen that after recompilation we receive an error message similar to this:
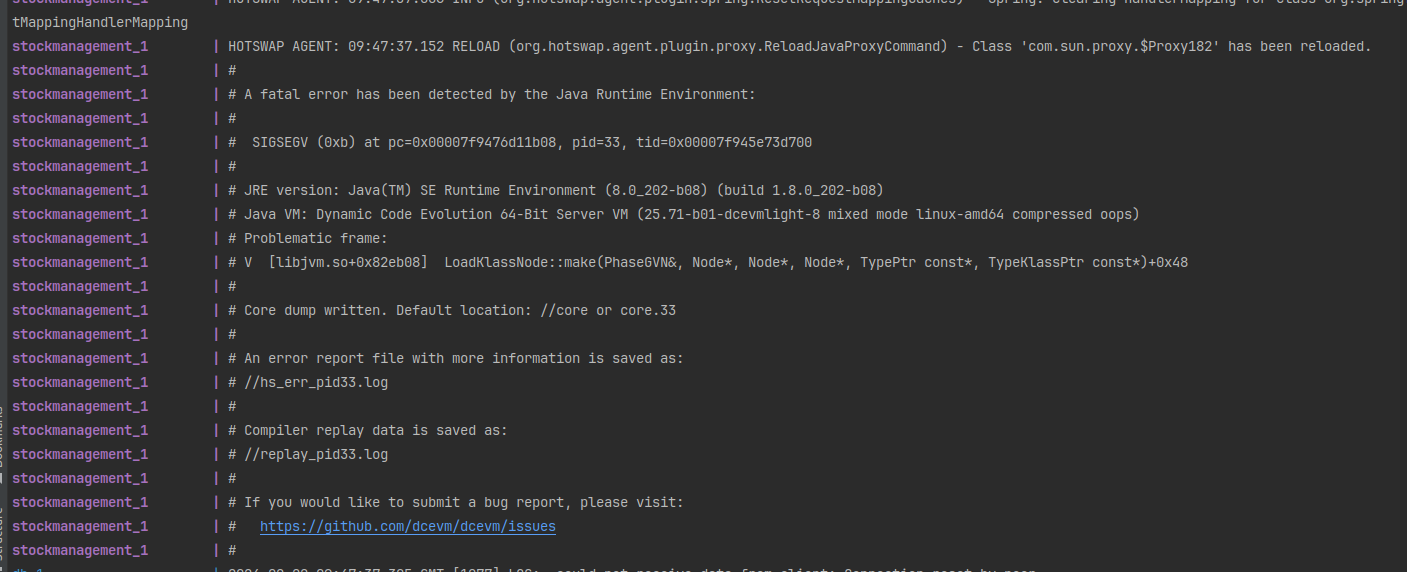
In our case, it was a problem with the Proxy plugin. To fix this error, we decided to disable it by following these steps:
In the hotswap-agent.properties file, add the following property and assign a value to it:
disabledPlugins=${disabled.plugins}In the environment variables for the container, add another JVM option:
-Ddisabled.plugins=ProxyWhen looking for the cause of plugin-related errors, application logs can be very useful. It’s worth taking a look at those related to the PluginRegistry class, for example:

Summary
In this article, we provided a step-by-step guide to adding hot reload functionality to Spring service in a containerized microservices-based application. Leveraging tools like DCEVM and HotSwapAgent, developers can achieve real-time code updates without restarting the entire application. The guide covers essential steps such as adding dependencies, configuring properties files, and setting up environment variables. Integrating hot reload significantly speeds up the development process, enhancing productivity for developers.